How to install Qt 5.6 and PyQt5 in a Python 3.4 virtual environment on Mac OS X and Linux

This is a simple guide on installing the latest Qt (currently 5.6) and PyQt5 on Mac OS X 10.11 (El Capitan) and Linux with Python 3.4, inside a virtual environment.
Installation Steps
- Python 3
- Xcode and command-line tools
- Qt libraries
- Virtual environment
- SIP Python package
- PyQt5 Python package
Python 3
First of all, make sure that Python 3 is available on your system. You can easily check this by opening the terminal and entering the command python3. If you need to install it, check out the Python homepage, or install it with homebrew (brew install python3) on OS X or your favorite Linux package manager.
Install Xcode and command-line tools
If you are using OS X, download Xcode and install it. Then install the command-line tools by entering the following command in the terminal: xcode-select --install. This adds a number of tools to your system, such as make, git, gcc, c++ and g++.
Install Qt Libraries
First we need to download and install the Qt libraries:
I’d recommend to install Qt into the directory /opt/qt. The installation requires about 14 GB of disk space, and includes a number of apps and utilities:
Qt Creator.app- a complete IDE with a graphical GUI designer and code editor (more)5.6/clang_64/bin/Designer.app- the GUI designer5.6/clang_64/bin/pixeltool.app- a tool to inspect the pixels around the mouse cursor5.6/clang_64/bin/qmlscene- execute scenes from .QML files5.6/clang_64/bin/qtdiag- Prints diagnostic output about the Qt library- Various others such as
qmllint,qmlmin,qmlplugindump,qmlprofiler,qmlscene,qmltestrunner
Furthermore the Qt installation includes a number of examples in the Examples subdirectory.
Create a virtualenv for the PyQt5 and SIP libs
For this guide, we create a virtual environment with Python 3.4 under the home directory in ~/.venv/qtproject:
# Create the directory
$ mkdir -p ~/.venv

# Create the virtual environment
$ python3 -m venv ~/.venv/qtproject

# Activate the virtual environment
$ . ~/.venv/qtproject/bin/activate
At this point, typing the command which python3 should output something like ~/.venv/qtproject/bin/python3.
Install SIP
PyQt requires to have the SIP module installed. SIP is a tool for automatically generating Python bindings for C and C++ libraries.
You can either download the .tar.gz file, or install the latest from the source repository with mercurial (hg):
# Clone the source code
$ cd /tmp/
$ hg clone http://www.riverbankcomputing.com/hg/sip
$ cd sip

# Generate the build configuration
$ python2.7 build.py prepare  # build.py is a Python 2 script
$ python3.4 configure.py -d ~/.venv/qtproject/lib/python3.4/site-packages

# Make and install
$ make
$ sudo make install
$ sudo make clean
Install PyQt5
Finally we get to install the PyQt5 module.
Start by downloading the tar.gz file, in this case PyQt-gpl-5.5.1.tar.gz, and extracting it:
# Extract the tar.gz file
$ tar -xvf PyQt-gpl-5.5.1.tar.gz

# Change into the PyQt source directory
$ cd PyQt-gpl-5.5.1

# Generate the build configuration (make sure to reference 'qmake' from the Qt libs installation directory)
$ python3 configure.py --destdir ~/.venv/qtproject/lib/python3.4/site-packages --qmake /opt/qt/5.6/clang_64/bin/qmake

# Make and install
$ make  # this takes a really long time
$ sudo make install
$ sudo make clean
All Done!
At this point, everything is successfully installed! Now let’s check if everything works by importing PyQt5 from Python 3.4:
~/.venv/qtproject/bin/python3 -c "import PyQt5"And just for the sake of it, let’s build a simple hello world Qt application:
from PyQt5.QtWidgets import QApplication, QWidget, QLabel
if __name__ == "__main__":
app = QApplication()
# Build the window widget
w = QWidget()
w.setGeometry(300, 300, 250, 150) # x, y, w, h
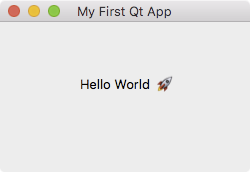
w.setWindowTitle("My First Qt App")
# Add a label with tooltip
label = QLabel("Hello World 🚀", w)
label.setToolTip("This is a <b>QLabel</b> widget with Tooltip")
label.resize(label.sizeHint())
label.move(80, 50)
# Show window and run
w.show()
app.exec_()Save this program as helloqt.py and execute it with python3 helloqt.py (or, if the virtualenv is not activated, with ~/.venv/qtproject/bin/python3 helloqt.py), and be greeted with this:
🎉 Congratulations 🎉
Now have fun with some GUI programming! Here are a few useful next steps:
If you have suggestions or feedback, let me know via @metachris
Update 2016-03-25: python3 -m venv instead of virtualenv